14/10/2007
- Left and Right Elevator bending & drilling
Well
the day has come to start bending. I am glad Bob is coming
up to help to be honest. He also bringing 1/8" metal bar to
fit into the trailing edge to stop the break fro crushing the
edge. Blue tack was used to hold it in place.
Apologies not too many pictures today, but a lot of progress was
made.
The
day starts with bending the right elevator and we follow the
instruction in the book. However this is not too successful
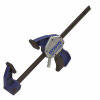
and Bob suggests using bar clamps (I have 4 of them) to clamp and
squeeze the two pieces of wood together instead of trying by hand.
To get a uniform bend it was necessary to stand the brake on end
with the trailing edge pointing down and the elevator leading edge
sticking up. The clamps could then be put on the outside all
the way along the edge of the break (hinge side) and then by
continually tightening up each clamp, gradually the elevator
closed up. This also meant it was much more precise that
just using levers to close the break. I had been dreading it
but it went very well and I am pleased with the result, especially
the left elevator (the second one we did) its absolutely spot on.
 These clamps are great and we used these to
'squeeze' the wooden bending brake.
Once
that was all done it was a matter of fitting the skeleton, match
drilling all the skins, horn etc and then finishing, and dimpling.


This was then repeated for the left hand side
elevator. At the end of the day Bob could take the right and
left elevator skeleton parts off for priming. They will be
done at the same time as the rudder skeleton already sent to him.